


The renegade row looks simple. You hold a plank and row a dumbbell. In practice, it is one of the hardest dumbbell exercises you can do.
It trains your back, arms, and core in one movement. It also exposes weak spots fast, especially if one side of your body is stronger than the other.
This guide covers correct renegade row form and the muscles it works. You will also learn the mistakes that ruin it and the variations that make it easier or harder. You will also get a simple plan for fitting it into your week.
What is the Renegade Row?
The renegade row is a plank with a dumbbell row built in. You start in a high plank with a dumbbell in each hand. Then you row one weight toward your ribcage while the other hand holds you up.
The hand on the floor is the real workload. It supports your body weight while your core fights to keep your hips from twisting. That anti-rotation demand is the point of the exercise.
Many people also call it the plank row or the renegade dumbbell row. Whatever the name, the movement is the same: a unilateral row performed from an unstable base.
Muscles Worked by the Renegade Row
The rowing arm trains the lats, rhomboids, rear delts, and biceps. The lats pull your elbow back. The rhomboids and mid traps squeeze your shoulder blade toward your spine.
The supporting arm works just as hard. The shoulder, chest, and triceps hold the plank, and the serratus anterior keeps your shoulder blade flat against your ribcage.
Your core does the most important job. The rectus abdominis, obliques, and transverse abdominis stop your torso from rotating when one hand leaves the floor. The glutes and quads stay tight to keep your legs rigid.
Even the spinal erectors and hip stabilizers get involved. That makes the renegade row a full-body exercise, not just a back exercise.
Benefits of the Renegade Row
The biggest benefit is anti-rotation strength. Your core learns to hold the torso still while a limb moves, which carries over to carrying, sprinting, and throwing.
The exercise also exposes side-to-side imbalances. If one side drifts or fatigues earlier, you will see it right away. Fix it with an extra set on the weaker side.
It is also time-efficient. One movement trains your back, arms, shoulders, and trunk, so you can cover more ground in a short session. Finally, it needs only two dumbbells, which suits home gyms.
How to do the Renegade Row Step by Step
Use hex dumbbells for your first sessions. Their flat sides keep them from rolling. Round dumbbells and some adjustable sets can wobble under load.
- Set two dumbbells on the floor, shoulder-width apart. Grip them and step back into a high plank.
- Place your hands directly under your shoulders. Set your feet slightly wider than hip-width for balance.
- Squeeze your glutes, brace your abs, and push the floor away. Your body should form one straight line from head to heels.
- Shift your weight slightly onto your left hand. Row the right dumbbell toward your hip, not your armpit.
- Keep your elbow close to your ribs. Stop when your upper arm is just past your torso.
- Pause for one second. Lower the weight slowly until it touches the floor, then reset your hips.
- Row with the left arm. Alternate sides for the rest of the set.
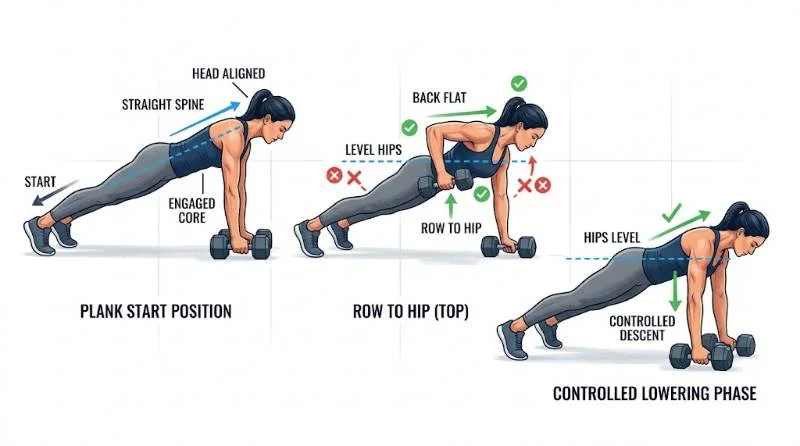
A good rep looks boring from the outside. Your hips stay level, your torso stays square to the floor, and only the arm moves. If you can see your hips rock, the weight is too heavy or your stance is too narrow.
Exhale as you row and inhale as you lower. Do not hold your breath, because bracing for a plank is easy to confuse with breath holding.
Common Renegade Row Mistakes
1: Rotating the Torso
This is the most common error. The hips open up as the dumbbell rises, and the row turns into a twisting swing. Fix it by widening your feet and slowing down. Imagine a glass of water on your lower back.
2: Using too Much Weight
Heavy dumbbells pull your shoulder forward and tip your hips. Your back barely works because momentum does the job. Drop the weight until each rep moves at the same smooth speed.
3: Sagging or Piking the Hips
A sagging lower back loads your spine. Hips that shoot up turn the move into a half pike and take the work off your core. Keep your ribs down and your glutes squeezed. A slight pike is safer than a sag.
4: Cutting the Range Short
Many lifters only lift the dumbbell a few inches. Pull until your elbow passes your torso, driving toward your back pocket. That is where your lats and rhomboids actually fire.
5: Sinking into the Supporting Shoulder
Watch the hand on the floor. If your chest sinks between your shoulders, the supporting side is quitting. Push the floor away so your upper back stays broad.
How much Weight to Use for the Renegade Row
Start much lighter than your normal dumbbell row. The plank steals strength from your rowing arm, so your working weight will drop sharply.
A useful test: perform five slow reps per side with your hips perfectly still. If you can, add weight next session. If your hips twist even once, stay put.
Choose dumbbells with a flat, stable base. Hex dumbbells are the safest option. Kettlebells work, but the offset handle makes them harder to row smoothly. Adjustable dumbbells work only if they lock firmly and sit flat.
Renegade Row vVariations
Pick the version that matches your current strength. Moving up too early only trains bad habits.
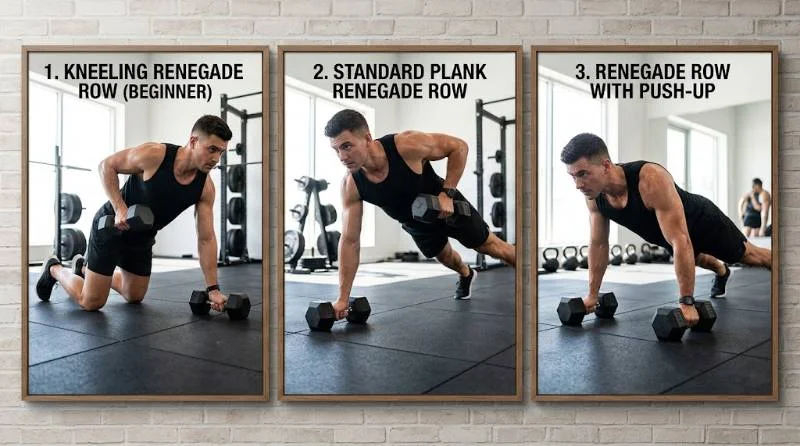
1: Kneeling Renegade Row
Drop your knees to the floor and keep a straight line from head to knees. This cuts the load on your core and shoulders. It is the best starting point for beginners.
2: Single-Dumbbell Renegade Row
Use a dumbbell in only the rowing hand and plant the other palm flat on the floor. This version lets you practice the rowing path without managing two unstable weights.
3: Renegade Row With Push-Up
Perform a push-up between each row. Your chest drops between the dumbbells, which adds chest and triceps work. Use lighter dumbbells than you would for the plain version.
4: Kettlebell Renegade Row
Kettlebells sit unevenly on the floor, so balance is harder. They suit lifters who have already mastered the dumbbell version.
5: Slow tempo Renegade Row
Add a two-second pause at the top of each row, or lower for a count of three. Tempo work makes a light dumbbell feel heavy without adding load.
Renegade Row vs bBent-Over Row
The bent-over row lets you load heavy and isolate the back. The renegade row trades load for stability. You will lift less, but you will train your core and shoulders at the same time.
Use bent-over rows when your goal is back size or max strength. Use renegade rows when your goal is trunk control, shoulder stability, or athletic carryover. Most lifters do best with both in different workouts.
Coaching Cues that Make the Renegade Row Easier
Cues help when the movement feels chaotic. Try these on your next set.
Spread your fingers and press through the whole palm of your hand. That keeps your wrist and shoulder steadier.
Think about crushing a sheet of paper under your armpit as you row. This keeps your elbow close and your lat active.
Look at a spot on the floor just ahead of your hands. A neutral neck keeps your upper back from rounding.
Finally, row at half the speed you think you need. Slow reps expose wobble before it becomes sloppy form.
How to Add the Renegade Row to Your Workout
Treat it as a core and back movement, not a max-effort lift. Place it early in an upper-body or full-body session, after your warm-up, while your core is fresh.
Beginners can start with two sets of five to six slow reps per side. Intermediate lifters can aim for three sets of eight per side. Rest 60 to 90 seconds between sets.
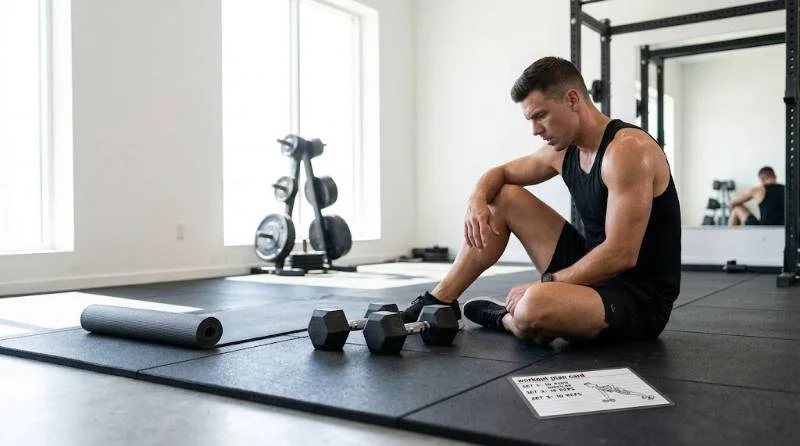
Add weight only when your hips stay still for every rep. If they do not, add reps or a pause instead. Doing the exercise two times a week is plenty for most people.
Warm up with a few cat-cow reps, scapular push-ups, and a 20-second plank.
Who Should Skip or Modify the Renegade Row
Skip this exercise during a shoulder, wrist, or lower-back flare-up. The plank load is high, and rowing adds twisting force. Check with a doctor or physical therapist if you have a current injury.
If your wrists hurt, keep them stacked under your shoulders and avoid bending them back. Wrist wraps can add support.
People with a hernia, or who are pregnant, should ask a clinician before loading planks.
If you cannot hold a clean plank for 30 seconds, build that first. Master the plank, then the dumbbell row, then combine them.