
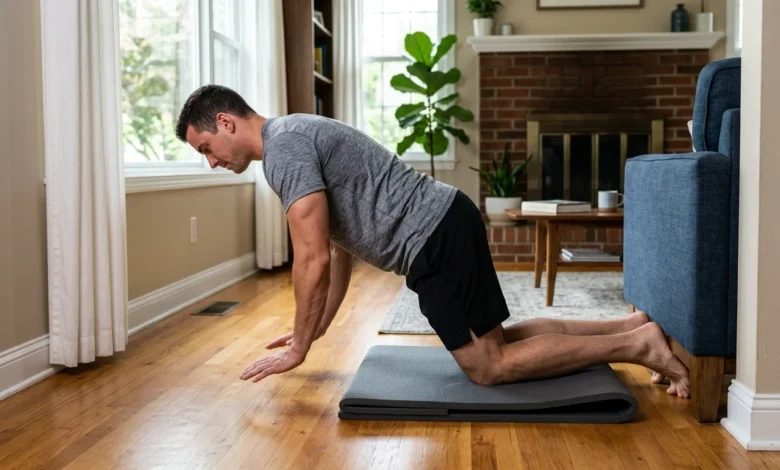
You can do a Nordic hamstring curl at home by locking your heels under something heavy, kneeling tall, and lowering your body toward the floor as slowly as you can while keeping a straight line from knees to head. You catch yourself with your hands at the bottom, push off just enough to return, and repeat. A couch, a loaded barbell, or a patient friend is all the equipment it takes.
The move looks simple, and that is part of the trap. It is one of the hardest bodyweight exercises for the back of your thigh, and doing it badly or too often is a fast route to a sore, angry hamstring. This guide covers safe anchor setups, step-by-step form, easier versions, and a six-week plan you can follow in your living room.
What the Nordic Hamstring Curl Trains
The Nordic hamstring curl is an eccentric exercise, which means your muscles work while they lengthen. As you fall forward, your hamstrings resist gravity and control the descent from your knees. That lengthening load resembles what the back of your thigh handles during a sprint, which is why athletes use it.
The evidence is solid. A 2011 cluster-randomized trial by Petersen and colleagues in the American Journal of Sports Medicine found that adding the exercise to soccer training cut hamstring injuries by more than half. A 2019 meta-analysis by van Dyk and colleagues in the British Journal of Sports Medicine, covering 8,459 athletes, reached a similar conclusion.
Training also changes the muscle itself. Bourne and colleagues reported in the British Journal of Sports Medicine in 2017 that the exercise lengthened muscle fascicles in the biceps femoris long head, the hamstring muscle that tears most often.
For most people working out at home, the payoff is more practical: stronger hamstrings for sprinting, hiking, stairs, and balancing the strength of your quads.
How It Compares With Other Hamstring Exercises
Romanian deadlifts train the hamstrings as hip extensors, while lying and seated leg curls train them as knee flexors. The Nordic curl keeps your hips fixed and asks the hamstrings to resist knee extension under your own body weight. Because the lever is longest near the floor, the hardest part comes at the bottom, which is why most people cannot lower all the way on day one.
That makes it a good partner for a hinge such as a Romanian deadlift, not a replacement for one. Do not confuse it with the reverse Nordic curl, which has you lean back from your knees and targets the quadriceps.
Compared with a leg curl machine, the Nordic curl needs no equipment, costs nothing, and loads the muscle while it lengthens, a pattern linked to the injury findings above.
What You Need Before You Start
The equipment list is short, but each item matters.
- A folded towel, yoga mat, or exercise pad under your knees.
- A non-slip surface, such as carpet or a rubber mat, so your knees do not slide.
- About six feet of clear floor in front of you.
- A secure anchor for your heels, covered next.
Wear long pants or thick socks if your skin sticks to the floor, and skip bare knees on hardwood.
Three Reliable Ways to Anchor Your Feet at Home
Your heels cannot move, or the whole exercise falls apart. Pick the setup that holds firm when you test it, not the one that looks convenient.
1. Heavy Couch Against a Wall
A wide, heavy sofa works if your heels fit under the front edge. Push it flush against a wall so it cannot slide backward. Pull hard on your feet against the frame before your first rep to check that nothing shifts.
2. Partner Holding Your Ankles
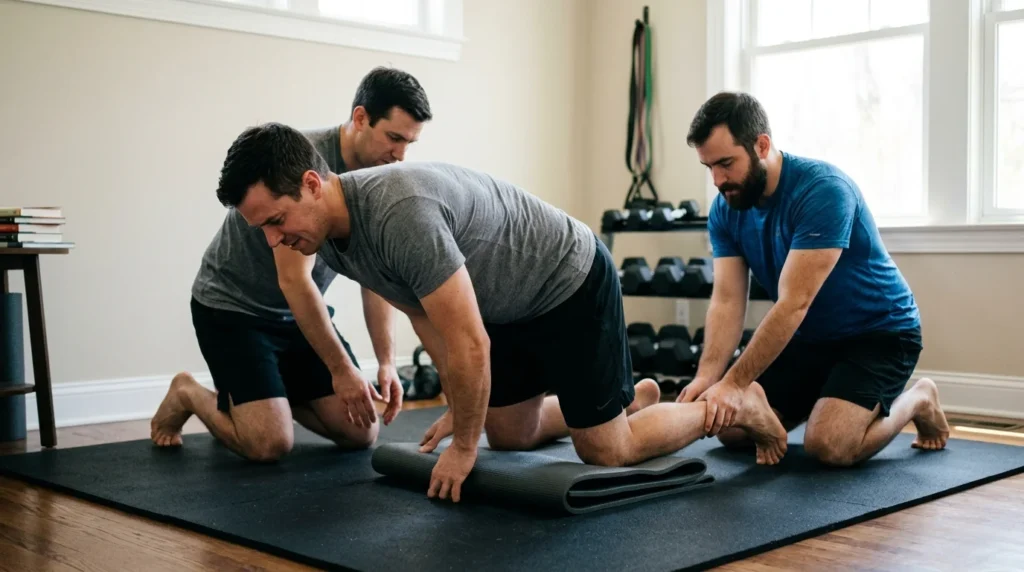
This is the most reliable option at home. Your partner kneels behind you and presses down on your lower calves, just above the ankles, leaning their body weight forward. Tell them to hold firm through your last rep, since your legs will push harder as you fatigue.
3. Loaded Barbell or Weight Bench
If you own a rack, set a barbell low enough to hook your heels under it, with a towel for padding. Load it heavier than your body weight and check that it does not lift when you pull up with your feet. A flat bench with heavy plates on its base can also work, though it should never tip or slide.
4. Setups to Skip
Skip light dining chairs, a bed on wheels, a stack of books, or a closed door you press against with your feet. Anything that can slide or swing will fail mid-rep, and you will be face down when it does.
How to Do a Nordic Hamstring Curl Step by Step
Here is the full sequence for a Nordic hamstring curl at home, using whichever anchor you chose.
- Kneel on the pad with your knees about hip-width apart, heels locked under the anchor, and your torso upright.
- Squeeze your glutes and brace your abs so your hips stay open. Cross your arms over your chest or hold your hands in front of your face.
- Lean forward from the knees as one straight piece. Do not fold at the waist.
- Lower for three to five seconds, resisting as long as you can.
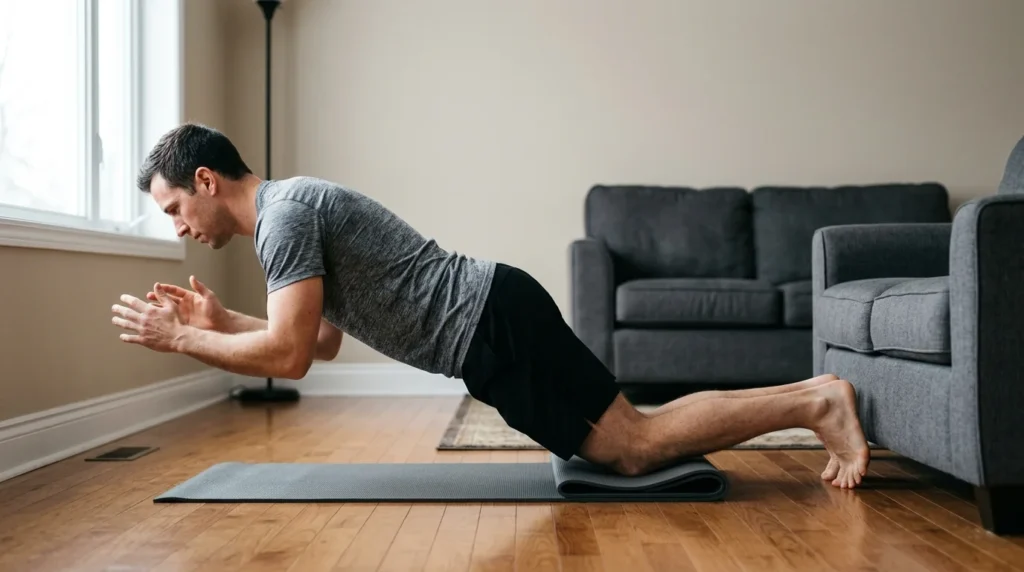
- When you can no longer hold the position, catch yourself with both hands, like the bottom of a push-up.
- Push lightly off the floor to bring your torso back to the start, then reset your hips before the next rep.
Keep your head in line with your spine and look at a spot on the floor a few feet ahead. Cranking your chin up or tucking it into your chest pulls your torso out of line and throws off your balance.
Tempo and Range Cues
A slow count is the simplest way to know you are doing it right. If you hit the floor in under two seconds, the exercise is too hard for your current level, so use a band or limit the range.
Your range will be short at first, and that is normal. Many beginners can control only the first part of the lean. Stop the descent there, catch yourself, and build from it.
Easier Versions When You Cannot Control the Descent
1. Hands-Assisted Partial Reps
Lower only as far as you can control, then use your hands early and push off the floor harder. This version keeps the same movement while taking load off your hamstrings, and most people start here.
2. Band-Assisted Nordic Curls
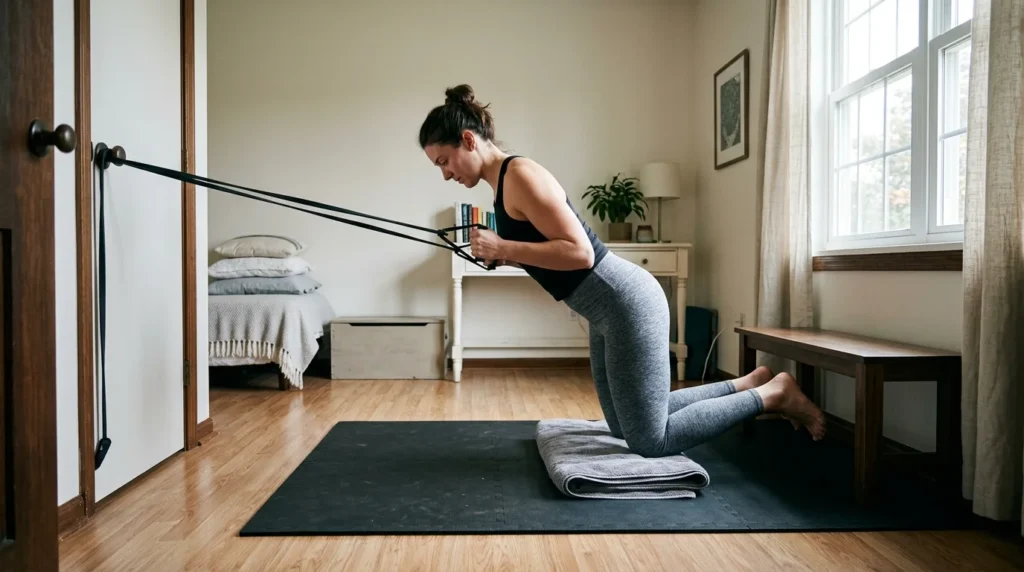
Attach a resistance band to a door anchor at about chest height, with the door closed and latched. The door should open away from you so the band’s pull keeps it shut. Hold the band against your chest as you lower, and let it help you back up.
Thicker bands make the exercise easier. Swap to a lighter band every couple of weeks until you can do it without help.
3. The Break-Point Check
Prop your phone at floor level and film a side view of a set. Replay it and find the moment your speed jumps, which I call the break point. That is the angle where your hamstrings stop controlling the fall.
Film again every two weeks. If the break point moves lower, your strength is improving even when your rep count stays the same.
A Six-Week Plan for Beginners
This plan starts lower than the 10-week program used in Petersen’s trial, which built volume gradually. Train twice a week with at least 48 hours between sessions, such as Monday and Thursday.
| Week | Sessions | Sets x Reps | Notes |
| 1 | 2 | 2 x 4 | Partial range, band if needed |
| 2 | 2 | 2 x 5 | Aim for a three-second lowering |
| 3 | 2 | 3 x 5 | Add the break-point video |
| 4 | 2 | 3 x 6 | Reduce hand push-off |
| 5 | 2 | 3 x 6 | Slow the lowering to four seconds |
| 6 | 2 | 3 x 8 | Move up only if soreness is mild |
Rest 90 seconds to two minutes between sets. Stop each set when your form breaks, not when you are exhausted.
Expect a deep, tight soreness in the hamstrings for a day or two after the first session. That is delayed onset muscle soreness, and it is common with eccentric training. If it limits normal walking, cut the next session in half.
After Week Six
Once you can do three sets of eight with a five-second lowering, you have a few options. Slow the descent to six seconds, drop the hand push-off, or hold a light weight plate against your chest. Add only one change at a time and keep the twice-weekly schedule. If you plateau, take an easy week at two sets of five before pushing again.
Common Mistakes and How to Fix Them
Most failed reps trace back to a handful of habits.
1. Folding at the Hips
Sticking your butt back lets your glutes and lower back take over and shrinks the load on your hamstrings. Squeeze your glutes before you start and imagine a plank tilting forward from the knees.
2. Falling Without Resisting
If you drop through the first half and brake at the end, you are skipping the part that builds strength. Slow the first third on purpose, even if that shortens your range.
3. Kneeling on a Hard Floor
Bare knees on hardwood will hurt long before your hamstrings tire. Use a thick pad that runs from your kneecaps to your shins, and check that the pad itself does not slide.
4. Training Too Much Too Soon
Doing four sets of 10 on day one is the surest way to wake up unable to bend down. Start with the numbers in the plan and add volume only after soreness settles.
Alternatives If You Cannot Anchor Safely
Without a safe anchor, other hamstring moves are a better choice than a shaky nordic curl. Sliding leg curls on a hardwood floor with a towel under your heels give a similar eccentric load with less demand. Single-leg Romanian deadlifts with dumbbells and glute bridge walkouts also work the back of your thigh without any anchor.
Pick one and keep the same weekly schedule from the plan above.
Who Should Skip or Modify It
Check with a doctor or physical therapist first if you have a current or recent hamstring strain, knee pain, or a history of knee surgery. The exercise puts a heavy load on the knees and the back of the thigh, and a damaged hamstring can reinjure under it.
Stop right away if you feel sharp pain, a pop, or pain behind the knee. This guide is general fitness information, not medical advice.
Where It Fits in Your Week
Do it early in a session, after a two-minute warm-up of leg swings, bodyweight good mornings, and a few glute bridges, because tired hamstrings strain more easily. If you play a sport, keep it away from your hardest sprint day. Once or twice a week is enough for most people.
A nordic hamstring curl at home takes about ten minutes, a mat, and a solid anchor. Start with three or four slow reps, film your break point, and add a rep when the movement feels controlled.
Schema note: Article schema applies. Validate it with Google’s Rich Results Test before publishing. Flag for periodic review: study references and any updated research on the exercise.