
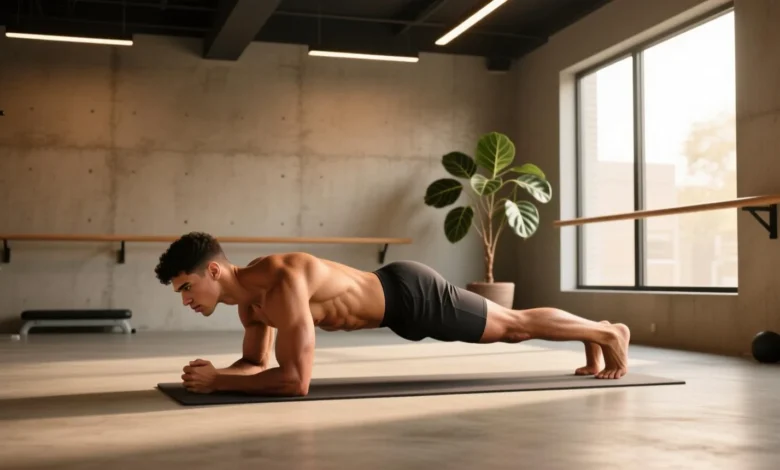
A plank is a simple bodyweight exercise that strengthens your abdominal muscles, back, shoulders, and core. To perform it correctly, support your body on your forearms and toes, keep your elbows beneath your shoulders, and maintain a straight line from your head to your heels.
Learning how to do a plank exercise properly helps you build core strength, improve stability, and develop better control over your body. You don’t need expensive gym equipment or a complicated workout plan to get started. An exercise mat and a little floor space are enough.
Whether you’re a beginner or someone who already exercises regularly, understanding proper plank form can help you get more out of every repetition.
What Is a Plank Exercise?
A plank is an isometric bodyweight exercise, meaning you hold a position without repeatedly moving your joints. It requires your muscles to stay engaged while your body resists gravity.
The traditional forearm plank involves supporting your upper body on your elbows and forearms while balancing your lower body on your toes. Your abdominal muscles, back, shoulders, glutes, and legs work together to maintain stability.
Planks are popular because they are easy to perform at home, in a gym, or while traveling. You can also adjust the difficulty by changing your body position or using a modified version.
How to Do a Plank Exercise Step by Step
Follow these instructions to perform a traditional forearm plank with proper technique.
Step 1: Start on Your Stomach
Place an exercise mat on the floor and lie face down. Extend both legs behind you, keeping them approximately hip-width apart.
Position your forearms on the mat with your elbows bent. Your elbows should sit directly beneath your shoulders, and your forearms should point forward.
Step 2: Lift Your Body Off the Floor
Press your forearms into the mat and lift your chest, stomach, hips, and thighs away from the floor. Keep your weight balanced between your forearms and toes.
Your elbows should remain underneath your shoulders. Avoid moving them too far forward because this can make maintaining the position more difficult.
Step 3: Keep Your Body Straight
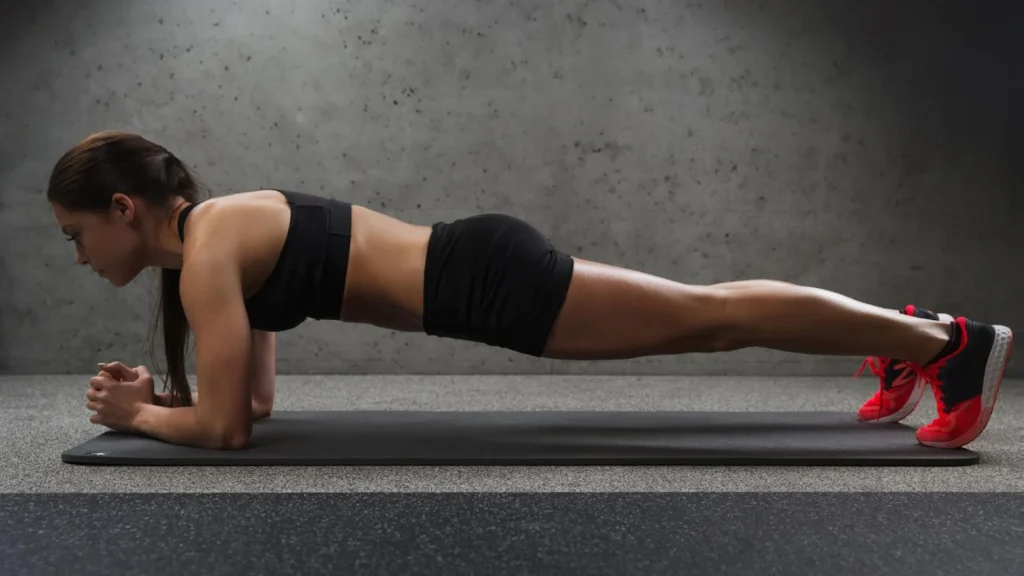
Create a straight line from the top of your head to your heels. Your hips should remain level with your shoulders and legs.
Avoid allowing your stomach to drop toward the floor or pushing your hips too high. Both positions can reduce the effectiveness of the exercise.
Step 4: Tighten Your Core and Glutes
Gently tighten your abdominal muscles as if preparing for someone to lightly push your stomach. Squeeze your glutes and keep your thighs engaged.
This helps stabilize your pelvis and lower back while you hold the position.
Step 5: Breathe and Maintain the Position
Keep your head in line with your spine and look toward the floor. Breathe slowly and naturally instead of holding your breath.
Maintain the position for as long as you can keep proper form. When your body starts losing alignment, lower your knees and rest.
The American Council on Exercise provides similar positioning instructions.
What Is the Correct Plank Position?
Proper alignment makes a big difference when performing a plank. Check these body positions before starting your next set.
- Head and neck: Keep your neck neutral and look toward the floor.
- Shoulders: Keep your shoulders away from your ears.
- Elbows: Position them directly beneath your shoulders.
- Back: Maintain a neutral spine without excessive arching.
- Hips: Keep your hips level instead of letting them sink or rise.
- Legs: Extend your legs and engage your thigh muscles.
- Feet: Balance on your toes with your feet comfortably spaced apart.
How Long Should You Hold a Plank?
The ideal plank duration depends on your current fitness level and ability to maintain good technique. Beginners don’t need to hold the position for several minutes to get started.
A short, controlled hold is a better starting point than a long attempt with poor posture.
Here is a simple starting guide:
| Fitness level | Suggested hold |
| Complete beginner | 10-15 seconds |
| Beginner | 15-30 seconds |
| Intermediate | 30-45 seconds |
| Advanced | 45-60 seconds |
These are suggested starting ranges, not official fitness standards. Adjust them according to your ability.
Try completing two or three sets with a comfortable rest between them. As your core strength improves, increase your holding time gradually.
If you can maintain perfect form for 30 seconds, you can work toward 35 or 40 seconds during later sessions. You don’t need to chase a record every time you exercise.
Common Plank Mistakes to Avoid
Even a simple exercise can become less effective when your body position changes. Watch out for these common mistakes.
1. Letting Your Hips Drop
When your abdominal muscles become tired, your hips may start sinking toward the floor. This can increase strain on your lower back.
Fix: Tighten your abdominal muscles and glutes. If you cannot maintain alignment, lower your knees and rest.
2. Raising Your Hips Too High
Pushing your hips toward the ceiling makes the exercise easier by changing the intended body position.
Fix: Check your body from the side and bring your hips back into alignment with your shoulders and heels.
3. Placing Your Elbows Incorrectly
Positioning your elbows too far forward can make it harder to control your shoulders and torso.
Fix: Keep your elbows directly beneath your shoulders before lifting your body.
4. Holding Your Breath
Some beginners automatically hold their breath while trying to maintain the plank. This can make the exercise feel harder.
Fix: Take steady breaths throughout the hold. You should be able to breathe without losing your position.
5. Looking Too Far Forward
Lifting your head and looking toward the front of the gym can create unnecessary neck tension.
Fix: Keep your head neutral and direct your eyes toward the floor.
Beginner-Friendly Plank Variations
If the traditional forearm plank feels too difficult, try an easier version. You can gradually move toward more challenging variations as your control improves.
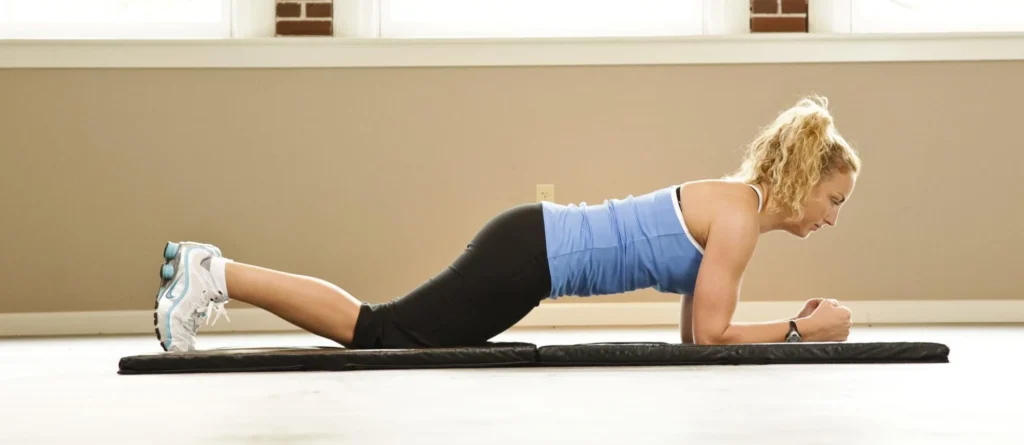
1. Knee Plank
This variation reduces the amount of body weight you need to support. Rest your knees on the floor while keeping your upper body supported by your forearms.
Maintain a straight line from your head to your knees and engage your abdominal muscles.
2. Incline Plank
Place your forearms or hands on a stable elevated surface, such as a sturdy bench. Extend your legs behind you and keep your body straight.
The elevated position reduces the challenge compared with a floor plank. It is a useful option for people who need a gentler starting point.
3. High Plank
Start in a push-up position with your hands directly beneath your shoulders. Extend your legs and balance on your toes.
Keep your arms straight, tighten your core, and avoid allowing your hips to sag. This variation also requires your shoulders and wrists to support your body.
What Muscles Does a Plank Exercise Work?
A plank primarily trains the muscles responsible for stabilizing your torso. Several muscle groups work together to keep your body in position.
- Rectus abdominis: Helps stabilize the front of your abdomen.
- Transverse abdominis: Provides deep abdominal support.
- Obliques: Help control rotation and maintain stability.
- Erector spinae: Supports your back and spinal position.
- Glutes: Help stabilize your hips and pelvis.
- Quadriceps: Keep your legs extended.
- Shoulders: Support your upper body during the hold.
Planks can improve core endurance and help you develop better control during other physical activities. Mayo Clinic also describes core exercises as a way to strengthen muscles around the abdomen and back.
How Often Should You Do Planks?
For most beginners, adding planks to two or three weekly workouts is a reasonable starting point. Give yourself enough recovery time, especially if your abdominal and shoulder muscles feel tired after training.
Try this simple routine:
- Week 1: Two sets of 10-15 seconds.
- Week 2: Two sets of 15-20 seconds.
- Week 3: Three sets of 20 seconds.
- Week 4: Three sets of 25-30 seconds.
Only increase your holding time when you can maintain proper alignment. If your form breaks down, stay at your current level or return to an easier variation.
You can include planks after your regular strength workout or during a short core training session.
What Are the Benefits of Doing Planks?
Regular plank practice can provide several fitness benefits when combined with a balanced exercise routine.
- Better core endurance: Your abdominal and back muscles become better at maintaining stable positions.
- Improved stability: Stronger core muscles support controlled movement during exercise and everyday activities.
- No special equipment: You can perform the exercise using your body weight and a comfortable floor surface.
- Easy to modify: Beginners can start with knee or incline planks and progress gradually.
- Support for other exercises: Better core control can help when performing movements such as push-ups, squats, and lunges.
Remember that planks alone cannot remove belly fat or guarantee visible abdominal muscles. Body composition depends on several factors, including nutrition, overall activity, and genetics.
How to Make Your Plank More Challenging
Once you can comfortably maintain a traditional plank for 30-60 seconds, you can try variations that require more strength and stability.
Some options include:
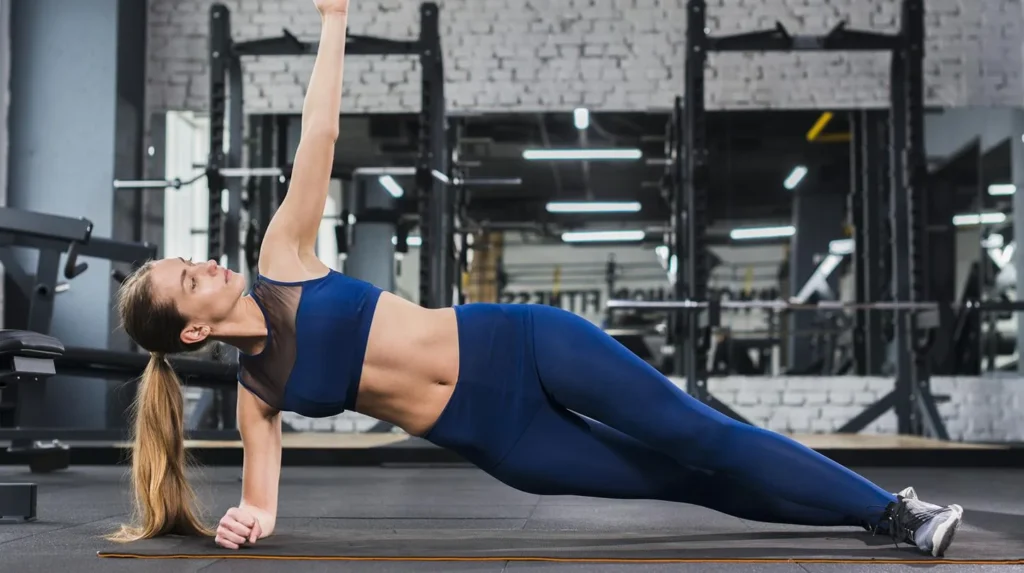
- Side plank: Balance on one forearm and the side of one foot while keeping your hips lifted. This targets the muscles along the sides of your abdomen.
- Plank shoulder taps: Start in a high plank and slowly touch one shoulder with the opposite hand. Keep your hips as still as possible.
- Plank leg lifts: Lift one leg slightly while maintaining a stable upper body. Alternate between legs without rotating your hips.
Do not rush into advanced variations. Build a comfortable foundation with standard planks before adding movements that make balance and control more difficult.
Plank Exercise Safety Tips
Planks suit many people, but proper technique and individual ability matter.
Keep these safety points in mind:
- Start with a modified plank if you struggle to maintain a straight body position.
- Use an exercise mat if the floor feels uncomfortable on your elbows.
- Avoid holding the position when your lower back begins to sag.
- Stop if you experience sharp pain in your back, shoulders, wrists, or neck.
- If you have an existing injury, persistent joint pain, or a medical condition that affects exercise, consult a qualified healthcare professional before starting.
Normal muscle fatigue is different from sharp or worsening pain. Never push through pain just to complete a timed hold.
The American Council on Exercise recommends stopping the movement if it causes lower-back pain.
Conclusion
Learning how to do a plank exercise correctly starts with simple body positioning. Keep your elbows beneath your shoulders, engage your abdominal muscles, maintain a straight body line, and breathe throughout the hold.
If you’re a beginner, start with 10-15 seconds and gradually increase your time as your strength improves. Focus on proper technique rather than trying to hold the position longer than you can.
A consistent approach will help you build better core endurance and make planks a useful part of your regular fitness routine.